5 Best Ways to Set Up Automated File Backup
Maybe you are tired of manual backup, here we offer 5 ways to set up automated file backup easily. Please keep reading and learn more about it.
Importance of Automated File Backup
When you use your computer in your daily life, you are bound to generate a lot of important data. If you do not back up your data, then they will be at risk of being attacked and deleted by mistake.
However, everyone created a lot of data and backing up all of it manually would take a lot of your time and effort. Also, if you forget to back up changing data in time, then there is still a risk of data loss. Automated file backup is a convenient way to back up your data regularly and easily, to keep it safe.
How to Set Up Automated File Backup
To create an automated file backup, maybe you need automated file backup software. Here we concluded the 5 best ways to set up automatic file backup with ease. According to your need, you can compare and pick one that suits you best.
Method 1. Create Automated File Backup via CBackup
The first automated file backup software we want to introduce is a professional cloud backup software - CBackup. CBackup allows you to backup PC to cloud directly and easily. Each account will get 5GB of free cloud storage from cloud, you can upload files to it without size limitation.
If you do not want to back up files to cloud, CBackup also supports you to back up to other cloud drives for free, including backing up files to Google Drive, Dropbox, OneDrive. If your backup space is used up, you can use the Combined Cloud Storage feature in CBackup to merge several cloud drive accounts into a huge backup space for free.
Importantly, CBackup provides a Scheduled Backup feature so that you can set up an automated file backup easily. There are 4 different time modes you can select according to your backup frequency, which will save you much time and effort.
To set up an automated file backup, you can follow these steps:
1. Download and install CBackup desktop application on your computer. Run it and sign up for an account.
2. Go to the Backup section, and press the Backup PC to cloud button to create a new automated file backup task.
3. Select local files that you want to back up to cloud and choose cloud.
5. Then you can go to the Settings window to select Scheduler so that your automated file backup can be performed regularly.
6. Finally, click on the Start Backup button to begin the new automated file backup.
Method 2. Create Automated File Backup in Windows File History
File History is a Windows system built-in backup tool and is also recommended by Microsoft for backing up files. File History's main function is to help you back up your personal files. Once you turn on the File History feature, it will back up your files automatically so you can also use it to create automated file backup. Here are the steps to use File Backup:
1. Type file history in the search column of the taskbar.
2. Select the Turn On button to enable File History.
3. When you see the following page, File History is on to set up automated file backup successfully.
4. And in the drop-down menu of Keep my backups, you can choose the length of backup.
Method 3. Create Automated File Backup in Windows Backup and Restore
Backup and Restore is also a built-in local backup tool for Windows systems. It provides the ability to back up files and folders as well as system images locally. You can choose either of two backup methods: normal backup, or incremental backup storage. And certainly, you can set up automated file backup with Backup and Restore as below:
Step1. Go to Windows Control Panel and find Backup and Restore.
Step 2. Select the Set up backup option to start your automated file backup. Then click Next.
3. You need to select the option that needs to be backed up.
4. Also, you can select the frequency for your backups by clicking the Change schedule link.
Method 4. Create Automated File Backup with OneDrive
OneDrive is a famous cloud storage but also can help you create automated file backup to OneDrive. You can choose to use the OneDrive desktop app to set up an automated file backup with the following steps:
1. If you use Window 11/10, you can go to OneDrive directly in the Start menu. If not, you need to download OneDrive desktop client on your computer first.
2. Enter your email address in this window, press Sign in.
3. Then you will see the This is your OneDrive folder screen window, click on Next if you accept the default folder location. Click on the Change location link if you want to change the folder location.
4. Go to the Settings to select Backup > Manage Backup. You can choose the folders you want to set up automated backup.
Method 5. Create Automated File Backup with AOMEI Backupper
AOMEI Backupper Standard is a free backup software for Windows systems. It can protect your operating system with system backup and allows you to set up an automated file backup as well. It also provides the service of backup to local disk, External Disk, USB flash drive, and so on. With the following steps, you can created an automated file backup with AOMEI Backupper easily:
1. Download and install the AOMEI Backupper application, launch it.
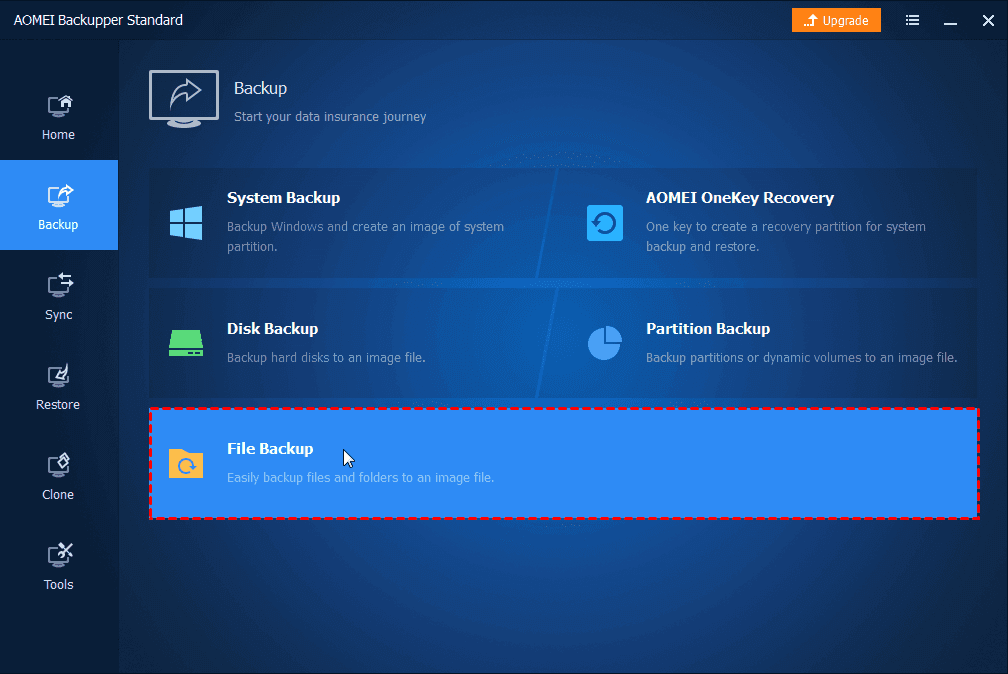
2. Select Backup > File Backup.
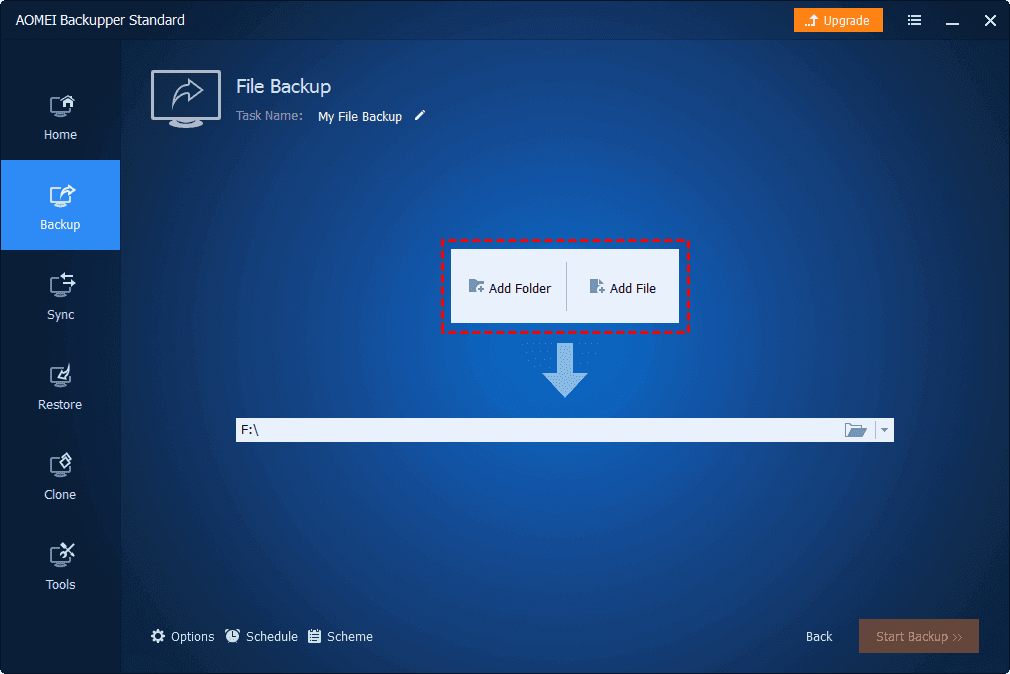
3. According to your need, choose Add Folder or Add File.
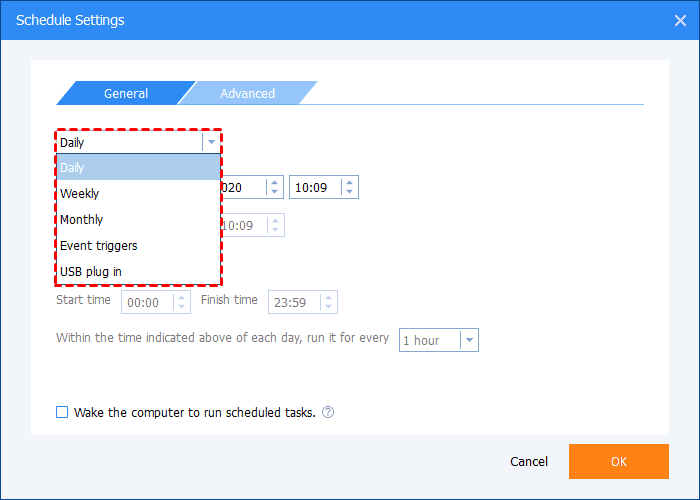
4. And you can click the Schedule option to create an automated file backup. With this feature, your backup can be performed daily/weekly/monthly.
Final Thoughts
After reading this article, maybe you have chosen the best way to set up automated file backup. If you feel difficult to make a decision, why not try the easy-to-use CBackup? With it, you can create automated file backup to the cloud for free.
Free Cloud Backup & Sync Service
Transfer files between cloud drives, combine cloud storage to gain free unlimited space
Secure & Free


