How to Set Up and Use Dropbox Selective Sync
What is Dropbox selective sync and how to choose which folders to sync on Dropbox? The official Dropbox app and CBacupper will provide help.
How do I use Dropbox selective sync?
I am used to backing up files on my Mac to Dropbox, but if I enable data sync, these files will quickly run out of storage in my account. I just want to sync certain folders in Dropbox. How can I do Dropbox selective sync on Windows 10 or Mac?
By default, when using the Dropbox app, it will synchronize all the content in the account to the computer. But this may cause confusion for some users. Dropbox selective sync is a useful feature in its desktop application. Enabling this feature allows you to specify which folders in the project are synced to the Mac or PC.
Why use Dropbox to choose folders to sync?
On the one hand, if you are using a Mac or a computer with small hard drive storage, Dropbox only syncs certain folders to free up hard drive space. For unselected files, they are still stored online, and you can access them on the Dropbox web page.
On the other hand, when you only want to sync sub-parts of a large project to your local computer, enabling selective sync with Dropbox can be more efficient.
So how to enable Dropbox selective sync? How to selectively sync files in Dropbox to other cloud drives when necessary? This article will introduce you to the correct method.
How to selective sync with Dropbox in 2 ways
Way 1. With Dropbox Selective Sync
The Dropbox app can be applied to most computer operating systems, including the most common Microsoft Windows and Apple Mac. Dropbox selects the folder to be synced and needs to be set in the application. The following steps are how to let Dropbox choose folders sync on Mac and Windows 10.
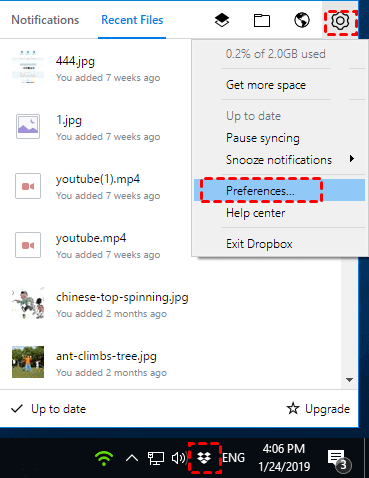
Step 1. Click on the Dropbox icon on the taskbar. No icon? Download and sign in to Dropbox first.
Step 2. Click the gear icon on the top right of the pop-up window and select Preferences...
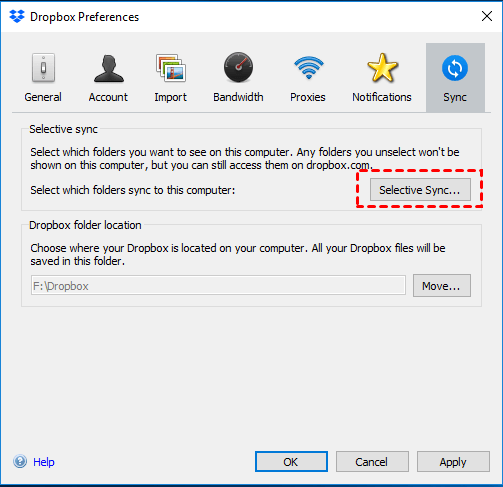
Step 3. Go to the Sync tab and select the Selective Sync button, then click OK. (On Windows 10)
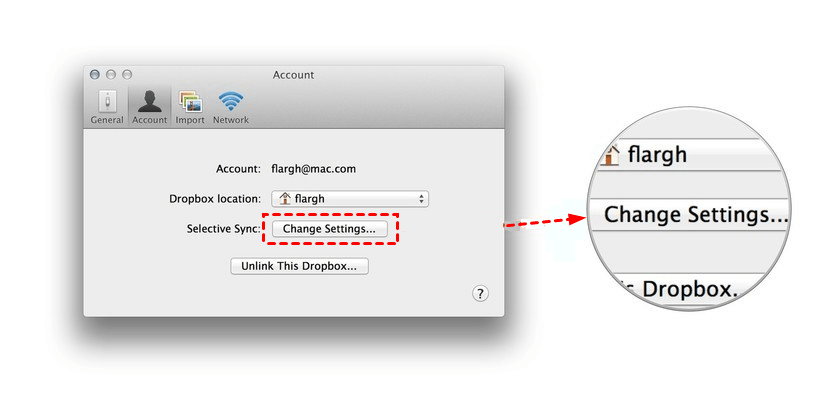
If you are using macOS, at this step you need to click Change Setting... next to Selective Sync under the Sync tab.
Step 4. Then check folders that need to be synced, click Update to confirm.
✎Note:
-
Folders that are not selected will not be deleted from the cloud or any other computer.
-
If you have more than one computer, in order to perform selective sync, you need to set it separately on each PC.
-
Dropbox's selective sync feature is not available on mobile devices (mobile phones/cellphones/iPhones and in android/iOS systems).
-
By default, your folder is located on both the Dropbox cloud and the local computer. Please make sure that there is enough space in both locations.
Way 2. With free cloud backup and sync service - CBackup
You can also use some free third-party tools such as CBackup to selectively synchronize folders with Dropbox. CBackup can selectively sync folders on your PC to Dropbox. Even if you delete the source files locally, the files that have been backed up to the cloud will not be affected and will still be stored in the Dropbox cloud. You can switch to this method if Dropbox selective sync is not working.
Step 1. Install the CBackup, get started to create an account, and sign in.
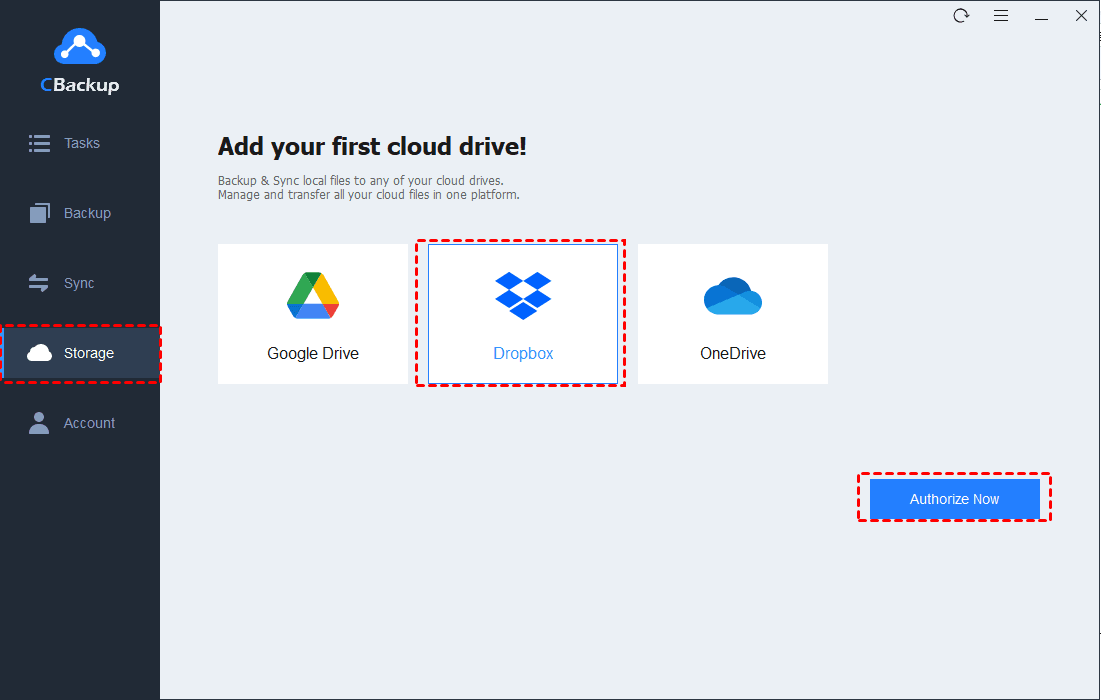
Step 2. Go to Storage and choose Dropbox and click Authorize Now. Then follow the guide to allow CBackup to access your Dropbox files.
Step 3. Go to Sync, then press the Sync PC to Public Cloud button to create your sync task.
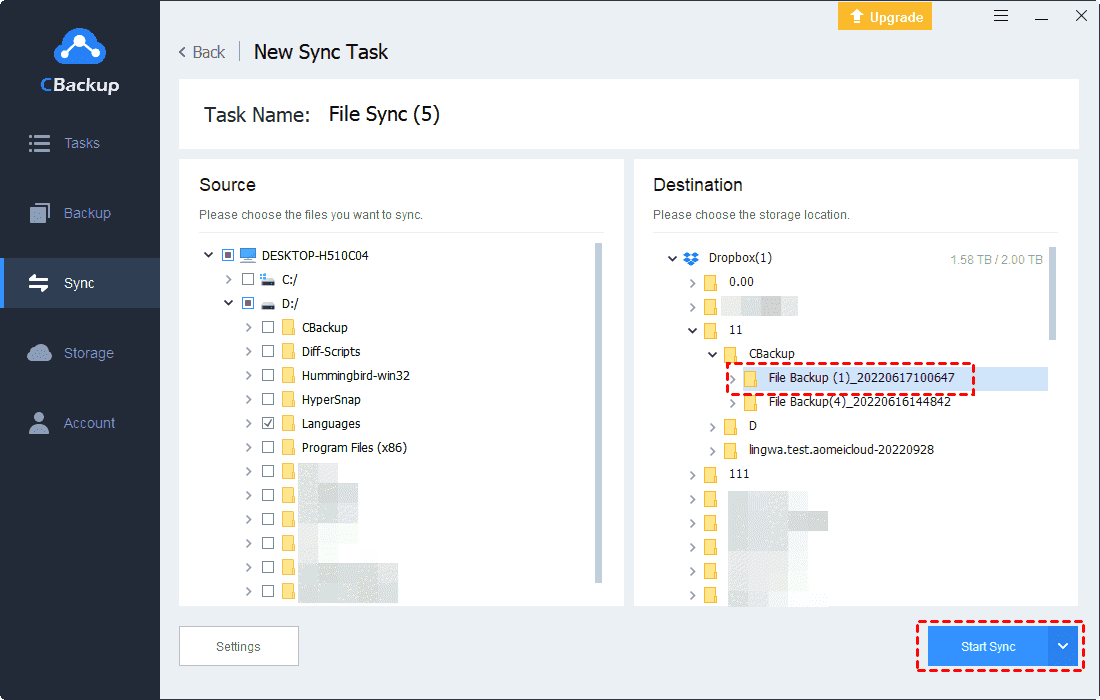
Step 4. Specify the Task Name, and select any folder from the PC that you want to upload to Dropbox.
Step 5. Select a Dropbox folder as the sync destination. Then, press the Start Sync button.
Dropbox selective sync from cloud to cloud
In addition to the selective sync between the Dropbox cloud and the local, you may need to choose which folders to sync to another cloud drive on Dropbox. Here we will tell you how to implement cloud to cloud sync easily and quickly with CBackup.
Step 1. Go to the CBackup website and sign in with your CBackup account.
Step 2. Log in, and click My Storage and the + >Add Cloud button subsequently, select the cloud drive you need to add (here is Dropbox and Google Drive).
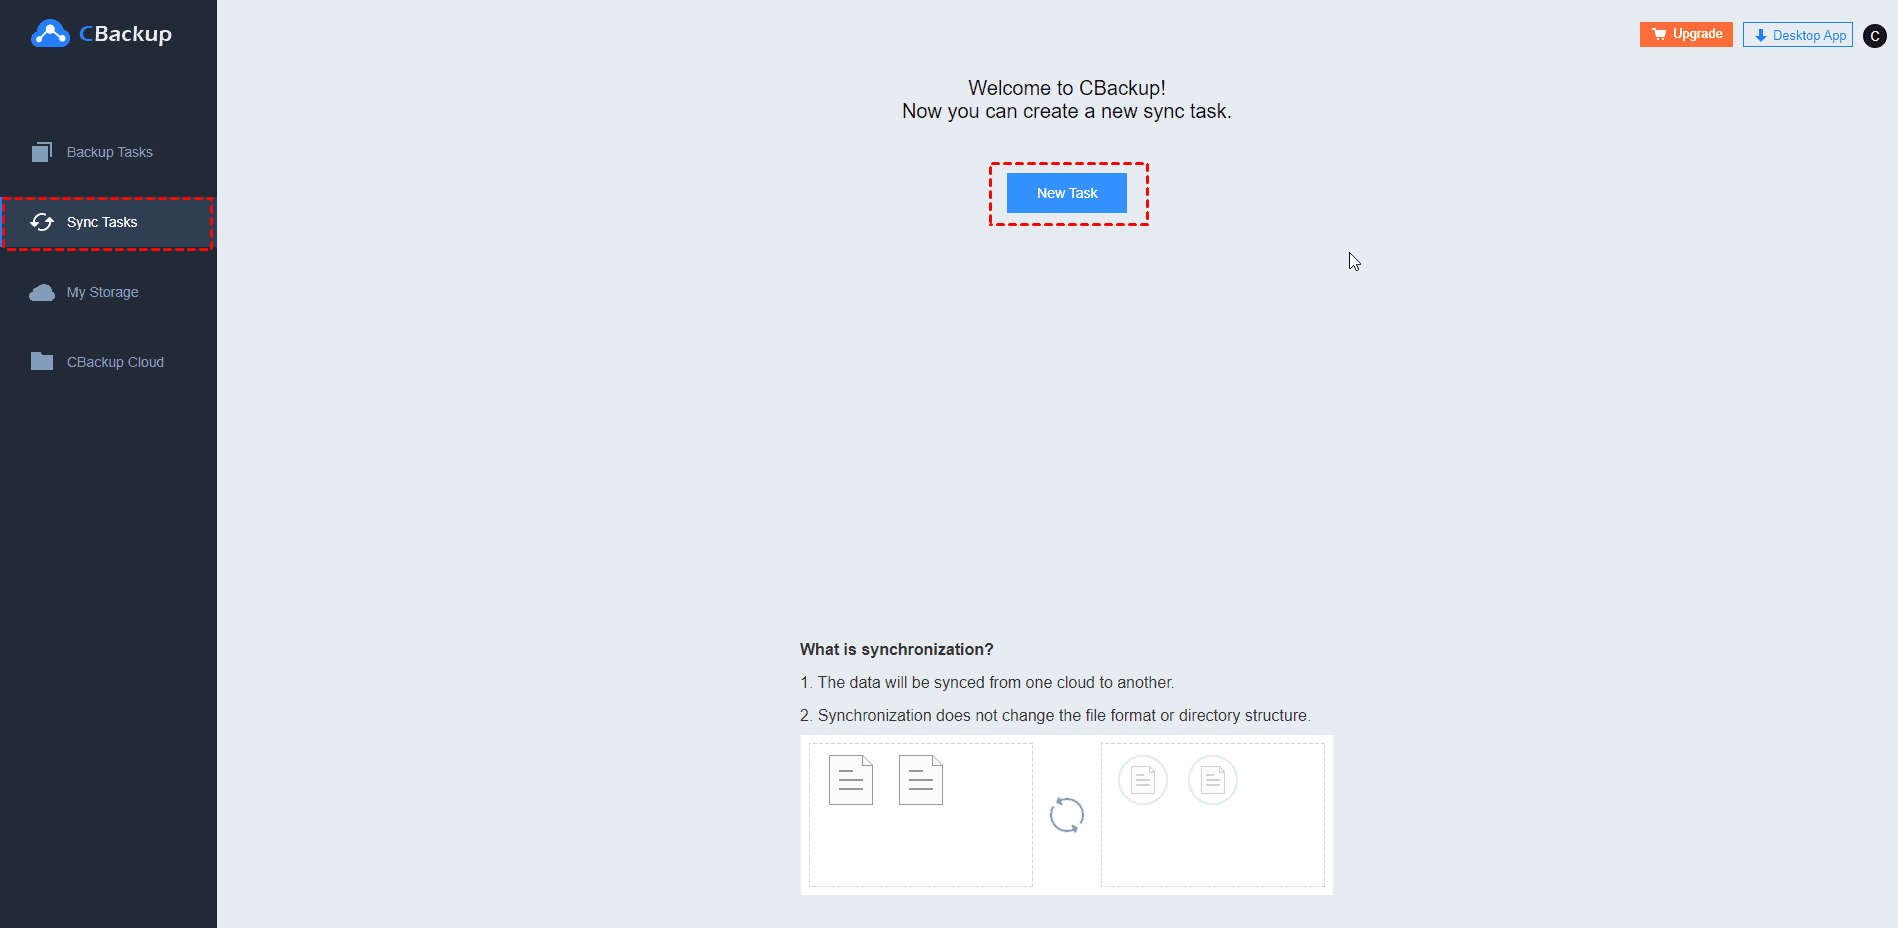
Step 3. Navigate to the Sync Tasks tab and select the New Task to create your sync task.
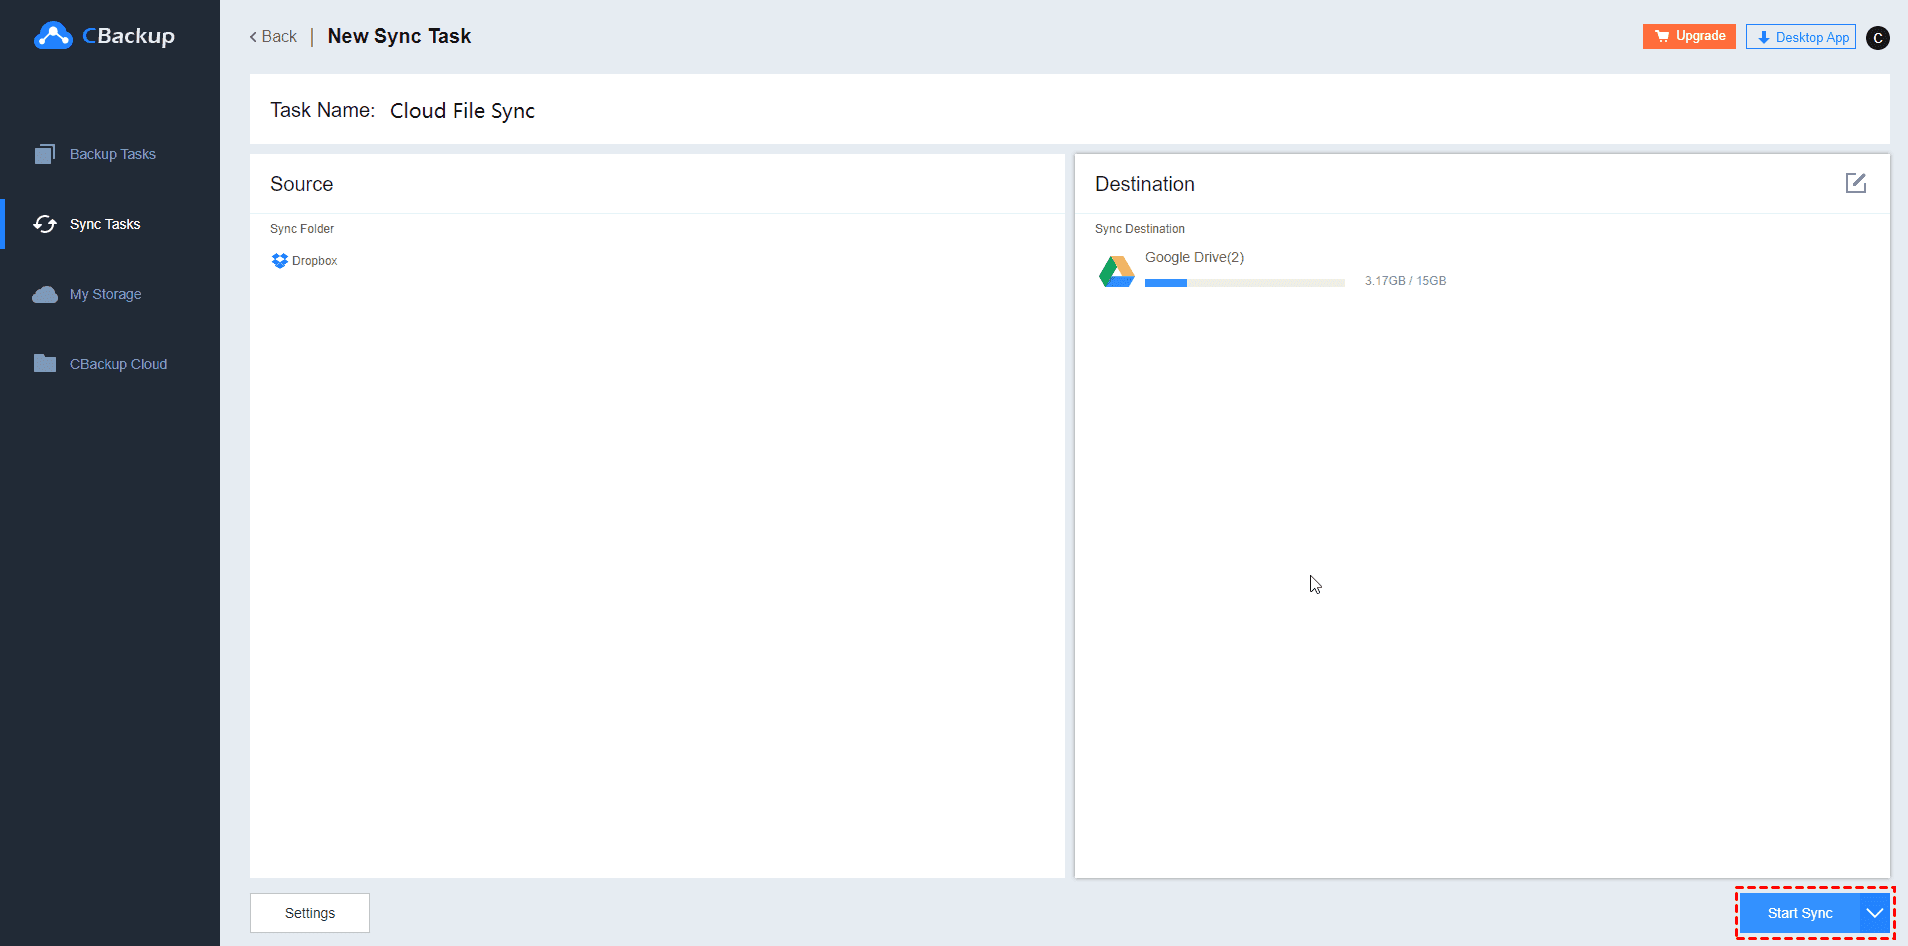
Step 4. Click Add Source to add Dropbox as the sync source, then click Add Destination to add Google Drive as the sync destination.
✎Note: When adding Dropbox, you can expand the Dropbox folder list and select only the folders that need to be synced as the sync source.
Step 5. After confirming that you need to sync to the Dropbox folder of Google Drive, click Start Sync to start the task.
Should I use Dropbox Smart Sync?
Smart Sync is also a function of the Dropbox app. If you are a user of Dropbox for Business, Dropbox pro, or Dropbox Plus, it is recommended that you use Dropbox Smart Sync instead of Dropbox selective sync.
Smart Sync can help you effectively save space on your hard drive. With Smart Sync enabled, you can make files and folders online-only, instead of completely deleting files and folders. Even if these data are only stored on the Dropbox website, you can see them from your local computer. Smart sync also has automatic settings, which can make files and folders online-only according to your usage.
Selective Sync vs. Smart Sync
Selective sync with Dropbox is to help you save hard drive space by deleting files from your local hard drive so that you can only save them on the Dropbox website. However, compared with Smart Sync, you will not be able to see these files or folders on your computer at all, and there is no automatic option for selective sync.
How do I fix selective sync conflict in Dropbox?
Dropbox selective sync conflict is a problem that many users may encounter after enabling this feature. This problem will not affect Dropbox's sync of other folders, and it is still safe to selectively sync all files in conflicting folders. When a selective sync conflict occurs in Dropbox, there are 3 solutions:
Solution 1. Add “selective sync conflict” after the folder name.
Solution 2. Change the name of one of the conflict folders.
Solution 3. Combine the required files in the conflict folder.
Final words
This article introduces how to set up and use Dropbox selective sync. You can use the Dropbox app to only sync certain folders with your PC, or you can use CBackup to choose folders to sync from Dropbox to another cloud drive in simple steps.
Free Cloud Backup & Sync Service
Transfer files between cloud drives, combine cloud storage to gain free unlimited space
Secure & Free


