How to Fix: OneDrive Autosave not Working on Mac/Windows
What to do when OneDrive Autosave not working in Microsoft Office? Follow this guide to find 5 effective solutions and a free way to auto-save local files to OneDrive easily.
Why is my AutoSave not working?
OneDrive AutoSave is an invaluable feature in Microsoft Office, automatically saving your work files at regular intervals. It proves especially useful in situations such as unexpected application crashes, computer crashes, or power failures. Nonetheless, encountering issues like OneDrive AutoSave not working can be extremely frustrating.
Usually, AutoSave not working in Word/Excel can be caused by the following reasons:
- You have not enabled the AutoSave feature correctly.
- Files do not save to OneDrive or SharePoint.
- The file format is not supported.
- Improper security settings of Microsoft Office.
If you're facing an issue where the AutoSave feature has stopped functioning in Excel, Word, or PowerPoint, you can follow this straightforward guide to resolve the problem with ease:
Right Steps to Turn on OneDrive AutoSave
How do I turn on AutoSave in OneDrive? To ensure Micorsoft OneDrive AutoSave not working is not caused by improper set-up, follow these steps to turn on AutoSave feature in Microsoft Word, Excel, and PowerPoint correctly:
Step 1. Go to the File menu in the respective Office application (Word, Excel, or PowerPoint).
Step 2. Select your OneDrive personal, work, or school account from the available options.
Step 3. A list of sub-folders will appear. Select the desired sub-folder where you want to save the file. Enter a file name for your document and click on the Save button.
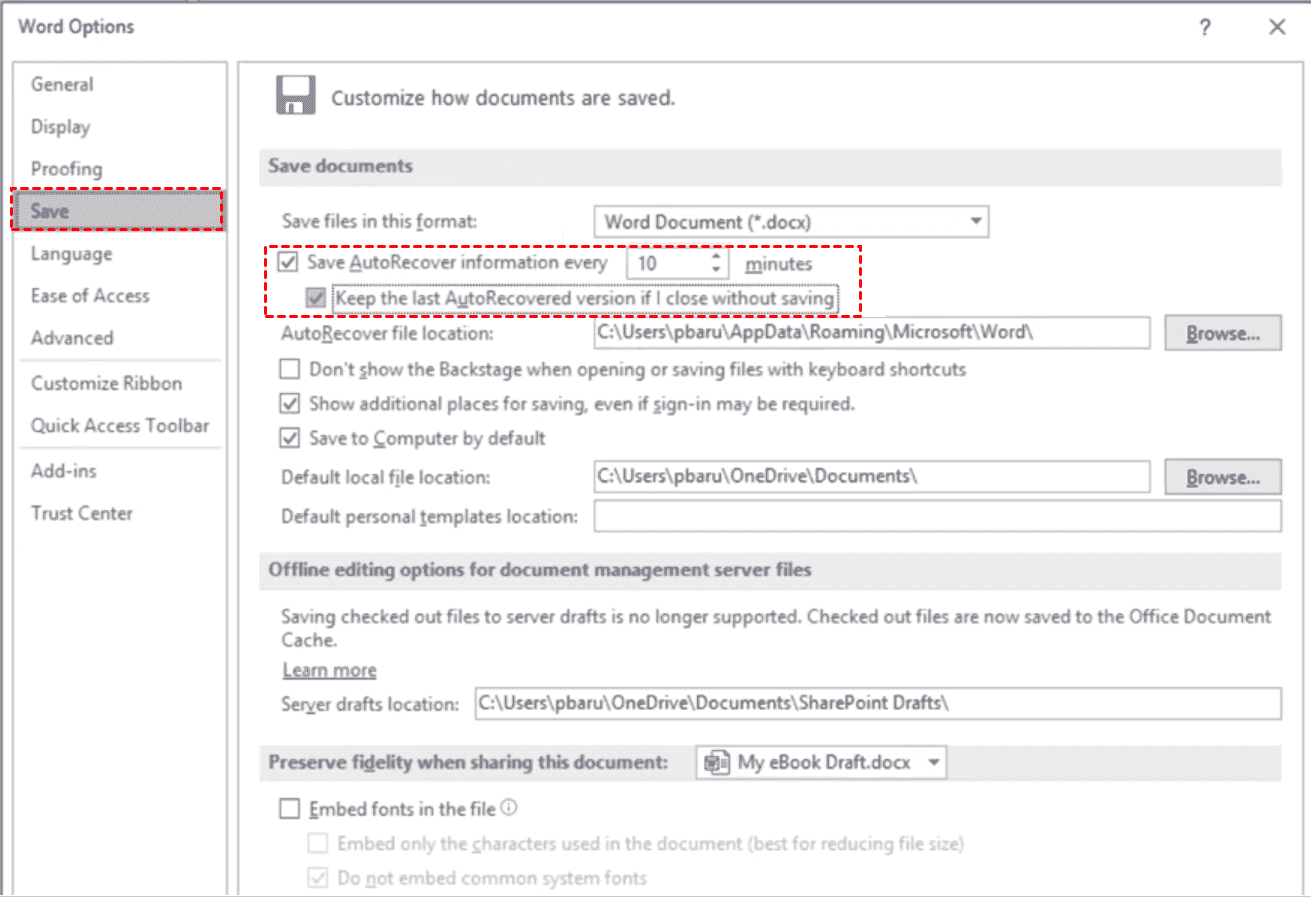
Alternatively, you can go to the File > Options > Save menu, check Save AutoRecover information every * minutes and Keep the last Auto Recovered version if I close without saving > hit OK.
5 Fixes to Solve OneDrive Autosave not Working on Mac/Windows
Apart from ensuring that AutoSave is properly set up, there are several solutions you can try to fix the issue of OneDrive AutoSave stopped working in Excel, Word, PowerPoint, or other Microsoft Office programs. Get through the following content to get full tutorials.
Way 1. Check File Location
There comes the question - Does autosave only work with OneDrive? Yes. The AutoSave feature is only available for files that are saved on OneDrive or SharePoint. If you are working on an unsaved file or a locally-saved file on your computer, you won't be able to use AutoSave.
Another possible reason for the OneDrive AutoSave feature not working is that your file is located in the local OneDrive folder or your OneDrive upload is failed and blocked. Check if there are any synchronization issues or if the OneDrive app is paused. Resolving these synchronization issues will enable the AutoSave feature to function properly and automatically save your files.
Way 2. Check File Formats
Older file formats like .ptt, .doc, or .xls are not supported on AutoSave. If you are saving a document with an old format, you can change the file extension to the latest format to fix Excel AutoSave not working on OneDrive.
To check the file extension, simply look at the title bar of the document. It should display the file extension as .xlsx for Excel, .docx for Word, and .pptx for PowerPoint. If the file extension is different, you can resolve it by renaming the file and replacing the existing extension with the appropriate one (.xlsx, .docx, or .pptx). This will ensure compatibility with the AutoSave feature and allow it to function as intended.
Way 3. Your File is Corrupted
Your file might be corrupted, causing Autosave not working in Word or Excel. In this case, please repair the corrupted file with the following steps to fix the problem.
Step 1. Open an Excel file that is not auto-saved.
Step 2. Go to the Open tab, and select the Browse button to locate the target document.
Step 3. Click the down-arrow position next to the Open button, and choose Open and Repair.
Way 4. Disable Security Features
Indeed, if the workbook contains certain features that are not compatible with the AutoSave feature, it can prevent AutoSave from working correctly as well, causing errors like AutoSave isn't available due to privacy settings. To address OneDrive AutoSave keeps turning off, consider the following steps:
Step 1. Go to the File menu in Excel and select Options.
Step 2. In the Excel Options window, head to the Add-ins tab. Next to the Manage field, choose Excel Add-ins and click on the Go button.
Step 3. In the Add-ins window, deselect all add-ins by unchecking the boxes next to them. Then, click OK to save the changes.
Way 5. Repair the Microsoft Office Program
If none of the solutions above helped you out, the last thing you can try is to repair or reinstalling Microsoft Office to resolve OneDrive AutoSave stopped working. This is because a missing component in the Microsoft Office app can also cause AutoSave not working errors.
Here’s how to repair Microsoft Office TO solve OneDrive AutoSave not working:
Step 1. Open Windows Settings, and then click on Apps.
Step 2. Tap on Microsoft Office and hit Modify. Then, click Yes.
Step 3. Click on Quick Repair > Repair to start the auto repair process of Microsoft Office.
Bonus Tip: Better Way to Automatically Save Local Files to OneDrive
AutoSave is available in Microsoft Excel, Word, and PowerPoint for Microsoft 365 subscribers. If you are a free OneDrive user and want to automatically save files on OneDrive, CBackup can help you. This software is a free cloud backup service that can help you sync saved Word and Excel document files, and any other types of files to OneDrive automatically.
✨Its Daily Sync feature allows you to schedule OneDrive sync daily, and there are Weekly Sync and Monthly Sync available.
✨In addition to Excel, PowerPoint, and Word files, you can also use it to upload audio, videos, pictures, and all kinds of files to OneDrive.
✨Except for file sync, CBackup also offers a Backup function that gives you the ability to use OneDrive for backup only, restoring file backups without time limitations.
✨Many mainstream public cloud drives are supported on CBackup, including OneDrive, Google Drive, Dropbox, and so on.
Now, you can install and apply this free CBackup software to save your Word, Excel, or PPT files to OneDrive with ease:
Step 1. Download and install CBackup on your Windows computer. Create a new account or log in with your existing credential to the OneDrive app.
Step 2. Click on Storage and select OneDrive as your cloud storage option, then tap on Authorize Now to authorize CBackup to access your OneDrive account.
Step 3. Choose Sync > Sync PC to Public Cloud in turn.
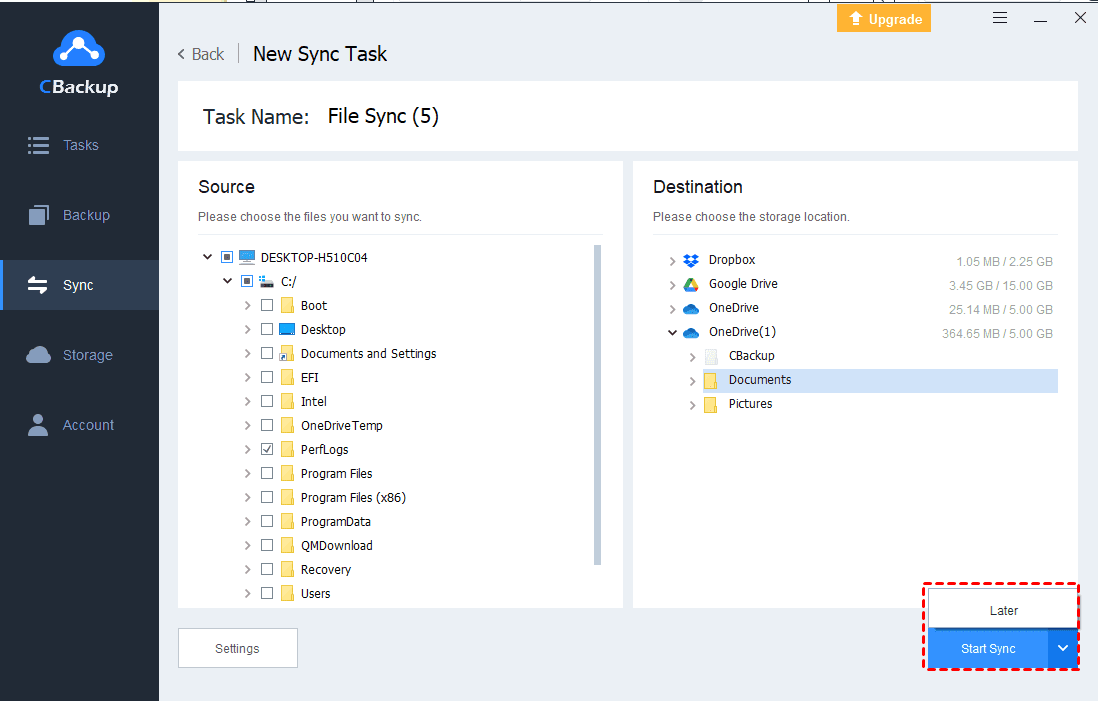
Step 4. Pick the computer files and folders you want to save online, specify a folder on OneDrive as the destination, and click Start Sync to initiate the process.
- Note: You can set up OneDrive auto sync in Settings and choose an automatic sync mode as needed under Scheduler.
Conclusion
Five tested solutions to help you solve the "OneDrive AutoSave not working" problem are provided on this page. Besides, there is a hassle-free solution that allows OneDrive free and paid users to automatically sync files to OneDrive seamlessly.
Free Cloud Backup & Sync Service
Transfer files between cloud drives, combine cloud storage to gain free unlimited space
Secure & Free


