How to Fix OneDrive Sync Issue "No Access Permissions to The Item"
How to fix OneDrive sync issue "no access permissions to the item"? 3 easy ways you can choose to solve your problem. Read on!
Why is OneDrive Saying I Don't Have Permission?
OneDrive sends a message: No access permissions to the Item. I am the owner and administrator! What moron programmed OneDrive to lock me out of my drive account so that it does not sync? I am a Microsoft 365 subscriber and an MS user since the beginning. This is ludicrous!
- Question from Microsoft community
Many people may encounter the same as users above, that is, OneDrive sync issue no access permissions to the item. There are many reasons for this issue, such as you don't have read/write permission for this file, your files are used by another application at the same time, or the bug of OneDrive itself. In order to solve problems like those, you can read the following solutions to find an answer.
How to Fix OneDrive Sync Issue "No Access Permissions to The Item"
Microsoft OneDrive hosts services bundled with Microsoft 365. OneDrive syncs from PC to cloud, fastens easy file sharing and seamless synchronization across a lot of devices. This flexibility ensures accessibility and continuity of data across various platforms. Users have the capability to upload Microsoft Office documents to OneDrive for efficient file management and collaboration.
However, issues may arise, error messages like "OneDrive sync issue no access permissions to the item." This can indeed stop access to specific files and folders, causing frustration for users. Fortunately, there are various solutions available to address this problem. Let's check it out!
Solution 1. Uninstall and Reinstall OneDrive
Most of the replies of "no access permission to the item" suggest a new install to fix. So let's have a look at how to uninstall and reinstall OneDrive to make things right.
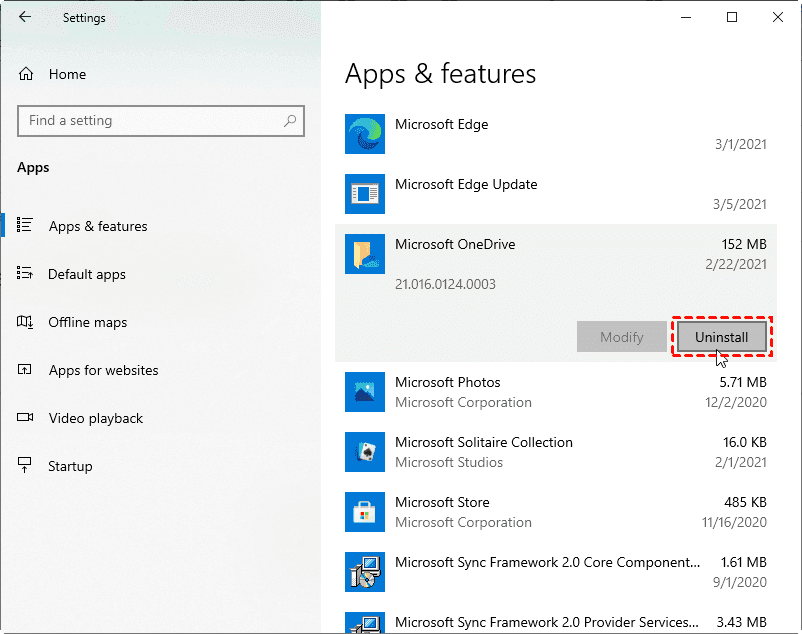
Step 1. Now uninstall OneDrive, press Windows + I to open Settings, choose Apps > Apps & features, search OneDrive and click it and hit Uninstall.
Step 2. After the process is finished, close Settings, navigate to the Microsoft OneDrive website and download the newest version of OneDrive.
Step 3. When the download is finished, complete the processing of the setup and check how things turn out.
Solution 2. Unlink and Relink Your Account
If you continue to encounter OneDrive access denied, you might consider unlinking and then re-linking your OneDrive account. This can often help resolve access issues and restore normal functionality.
Step 1. Click the OnnDrive on the Taskbar, click the gear icon on the right top, and choose Settings.
Step 2. Click Account On the left side and then choose Unlink this PC and hit Unlink account. Then your OneDrive account will unlink to your PC.
How to relink your OneDrive account
Step 1. Click OneDrive icon on the taskbar input your account email address and your password, and click Sign in.
Step 2. For users with two-factor authentication enabled for their Microsoft Account, the process involves selecting their preferred method of receiving the verification code. After selecting this option, they should fill in the required information and click on Send code. Subsequently, they should input the verification code sent by Microsoft and then click on Verify to complete the authentication process.
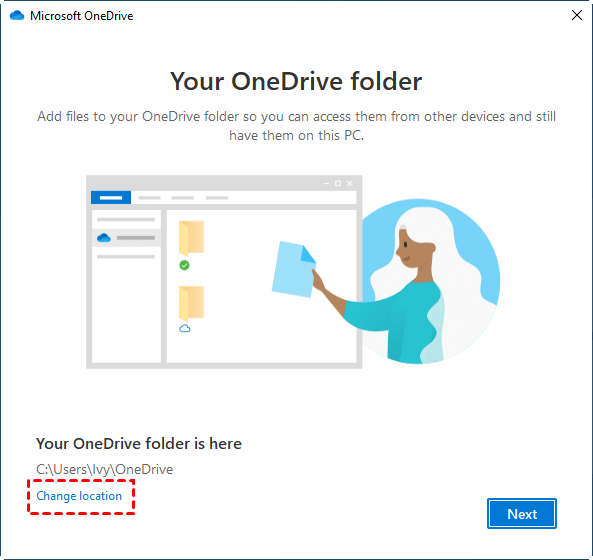
Step 3. To configure your OneDrive setup, follow these steps:
1. Take note of your OneDrive folder location, and then click Next. You can modify the directory if needed by clicking on Change location.
2. Proceed through the Welcome to OneDrive guide to familiarize yourself with the service.
3. After reviewing the guide, close the Microsoft OneDrive application.
4. Now, decide which folders you want to sync with OneDrive. This allows you to select which files are included in your OneDrive storage and synchronized across your devices.
Solution 3. Reset OneDrive
Resetting your OneDrive to default is the common way to eliminate a lot of sync errors, such as "no access permissions to the item on Windows 11". So let's see how to reset OneDrive to default.
Step 1. Press Windows + R to open Run and Ctrl + C and Ctrl + V the following in the taskbar and click OK.
- %localappdata%\Microsoft\OneDrive\onedrive.exe /reset
Step 2. Then allow the progress and wait a few moments, by the way, you will see the OneDrive icon disappear.
Step 3. When the icon reappears, click it to launch and see how things are going on. It might solve "OneDrive says no access permissions to the item".
Solution 4. Close The File
And if your computer pops out "This file is in use by another application", and undoubtedly you have no permission to sync it with OneDrive. At this time you can just close the file and then sync the file.
Solution 5. Ensure The File has Read/Write Permission
Another situation is your computer pops out "This file can't be synced because OneDrive doesn't have permission to access the file". When the OneDrive not syncing issue comes out, you can ensure whether the file has read or write permission or not. How to change read and write permission, keep reading!
Step 1. Right-click the file > choose Properties > Security.
Step 2. Under Group or user names, click Edit(you can add or remove) > select the name you need to edit, tick Full Control in the Allow line, and click OK.
Advice: Sync Your Data to OneDrive through CBackup with Ease and Safety
There exist several problems using OneDrive sync, and when these problems appear you need to spend a lot of time fixing them. So why not choose a safe and convenient tool to sync your data to OneDrive at the beginning? Here I give you my advice, hope it will give you help.
There is a lot of extraordinary software, and my advice is CBackup, which is an easy-to-use and free cloud backup and sync tool to help you back up data and also help you sync your data to OneDrive with a few clicks. Let’s see how to help you sync your data to OneDrive.
Step 1. Download and install CBackup on your computer. Register for an account and sign in to CBackup.
Step 2. Now you need to click Storage on the left pane to select OneDrive > Authorize Now to grant CBackup access to your cloud storage.
Step 3. Now, you can click the Sync tab on the left menu > choose Sync PC to Public Cloud, and then start to sync your files.
Note: In addition to syncing files to OneDrive, CBackup also offers a Backup feature that allows you to backup data with OneDrive. In this way, you can use OneDrive for backup only, and restore file backups when needed.
Step 4. Choose files that you want to sync to OneDrive, and then select a OneDrive folder as the destination. Now click Start Sync, CBackup will sync all files to OneDrive to your preference.
Tip: If you want to automatically sync your computer files to OneDrive. You can set your task as a scheduled sync task before hitting Start Sync. You can click Settings on the left bottom > Scheduler and finally set the time you want. (in advanced version)
Conclusion
When you are frustrated by the OneDrive sync issue "no access permissions to the item", you can read this article to find some ways to solve your problem. I hope those solutions can solve your problem.
And in order to sync and backup your data with ease and safety, I also give you my advice. You can choose CBackup to backup and sync files to OneDrive with ease and safety. Besides, with this software, you can backup and sync OneDrive files to another OneDrive account and other clouds, like Google Drive, Dropbox, and FTP/SFTP with ease.
Free Cloud Backup & Sync Service
Transfer files between cloud drives, combine cloud storage to gain free unlimited space
Secure & Free


