How to Set Up a Scheduled File Copy | 3 Methods Concluded
On this page, these methods can help you set up a scheduled file copy easily. Please read on it and find a suitable way.
How do I schedule a copy of a task?
I would like to know how to create a scheduled task that will copy files from my C: drive to my E: drive at a specified time. For instance, I would like to copy a folder (like "My Documents") from my C: drive to my E: drive every Friday at 5:00 pm. I think I understand the time part of the equation but I'm having trouble figuring out the 'task' part of it. Can anyone give me a step-by-step process to create such a thing? Or is there a better way to accomplish what I want to do?
If you also want to set up a scheduled file copy on your computer, you can try two different solutions and we will introduce them in the following part.
Why need a scheduled file copy?
As we all know, the 3-2-1 backup strategy advises you to store your files at 2 different locations. Thus, to protect your files, a scheduled task to copy files can be very useful. Once you create a schedule copy and paste files, you can:
• Access your files at these two locations.
• Sync your files without copying them manually.
• Keep the latest file version of your files.
3 easy methods for scheduled file copy
In general, there are 3 main solutions to Windows schedule file copy: use Task Scheduler or use backup software to do it. You can try them with the guideline below.
Method 1. Use robocopy command line
The most common way to set up scheduled file copy in Windows 10/11/8/8.1/7 is using command lines. Here we will introduce the most powerful command line - robocopy. Just follow these steps for scheduled file copy:
1. First, right-click on your desktop to select New > Text Document.
2. In the new text document, type the command below according to your situation and the syntax of robocopy:
robocopy [source] [destination]
Note: The syntax of robocopy is: robocopy [source] [destination]
- If you want to copy files from desktop to D drive, your commend is:
robocopy C:\Users\Administrator\Desktop\copy D:\copy
- If you want to know the result of the file copy and press any key to exit, just use the echo and pause commands, then you will receive a message after finishing the file copy:
@ECHO OFF
ECHO Copy completed!
robocopy C:\Users\Administrator\Desktop\copy D:\copy /s /z
robocopy C:\Users\Administrator\Desktop\copy1 D:\copy1 /s /z
PAUSE
3. Next, select File > Save As... and you can name the file, then modify the extension from .txt to .bat, and Save it. You can use parameters /mon:n,/mot:m, or /rh:hhmm-hhmm to create robocopy schedule task.
- ★Tips: You can refer to the meaning of these paremeters.
- /mon:n: Monitors the source, and runs again when more than n changes are detected.
- /mot:m: Monitors the source, and runs again in m minutes, if changes are detected.
- /rh:hhmm-hhmm: Specifies run times when new copies may be started.
Method 2. Use Robocopy and Task Scheduler
Besides, you can use Windows Task Scheduler to create a scheduled task to automatically copy files from one folder to another.
1. Just go to Control Panel > Administrative Tools > Task Scheduler. Click Create Basic Task, then follow the wizard to do it.
2. To set up a scheduled file copy task, you can choose the frequency according to your needs.
3. Then, select Start a program and browse the .bat file you just created.
4. After the above, click Finish. Then you can find it in the Task Scheduler Library and edit or delete it.
Method 3. Use free backup software - CBackup
If you feel it complex to use robocopy and Task Scheduler, you can try the free backup software - CBackup. There are some mainstream cloud drives on the market like Google Drive, Dropbox, OneDrive. With the help of it, you can set up a scheduled sync from PC to cloud for free. And CBackup will not limit your transfer speed. Thus, your backup tasks will be safe and in a high-speed way.
It can be used on Windows 11/10/8/7/XP, and let you copy files with the scheduler for free. Let’s try it with these steps:
1. Download and run CBackup on your Windows PC. Sign up for a CBackup account, then log in to the client.
2. Select your cloud drive in the Storage part. Then click on Authorize Now.
3. Choose the Sync tab > Sync PC to Public Cloud.
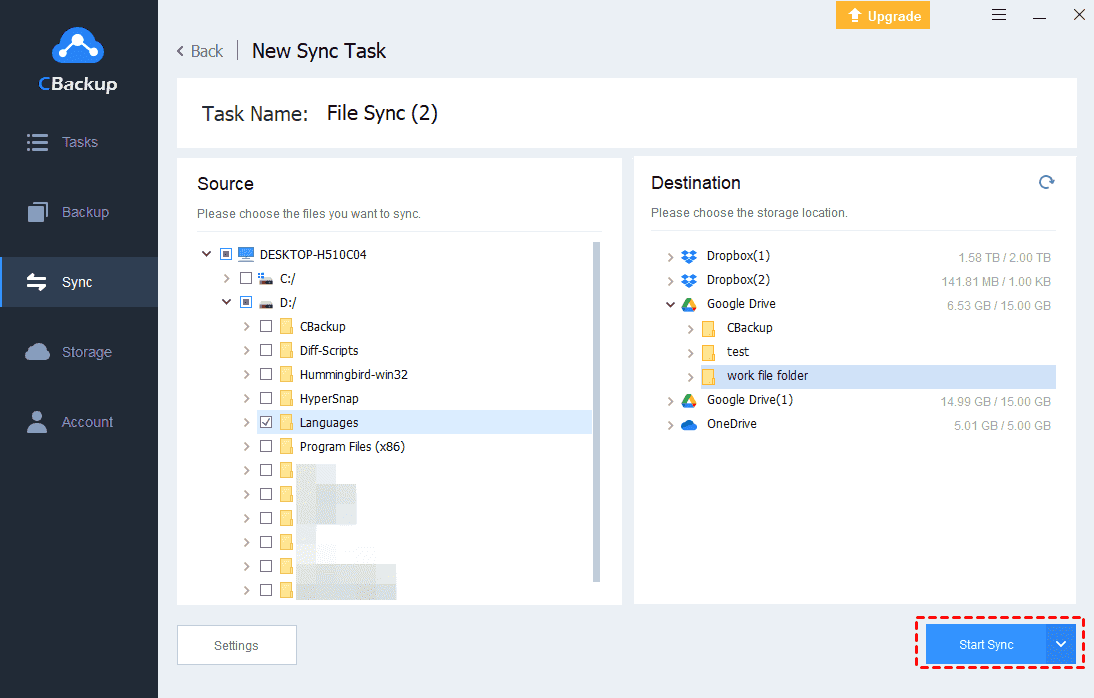
4. Choose your local files as the sync source. Then choose a folder in the cloud drive account you just added to CBackup as the sync destination.
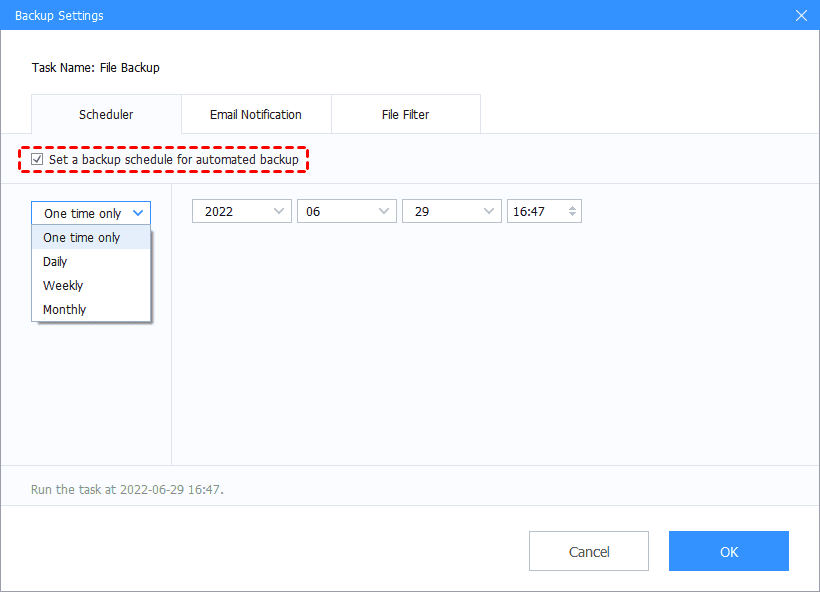
5. Press the Settings button to enable the Scheduler feature. There are 4 different scheduled mode you can choose for your sync task.
6. Finally, click on the Start Sync button to automatically copy files from one folder to another in Windows 10 or other versions of the Windows system.
How to copy files to a cloud drive easily
If your files need more comprehensive protection, or if you are running out of local storage space, then might you consider backing up files to a cloud drive?
Let’s see how to copy files from a PC to a cloud drive with CBackup:
1. Likewise, select + Add Cloud in the Storage part. You can select a cloud drive to add.
2. Next, select the Backup tab > the Backup PC to Public Cloud button.
3. You can change the Task Name. Then, select files from your computer in the Source section, and select the cloud drive account you just added as the target.
4. Click the Start Backup button to copy your files to the cloud easily.
Conclusion
After reading this post, you may learn the best way to set up a scheduled file copy. Rebocopy, Task Scheduler, and AOMEI Backupper Standard can help you do it. In addition, if you want to copy your files to the cloud, you can try using CBackup to help you. CBackup allows you to create scheduled file copy tasks from PC to cloud and get unlimited cloud storage for free.
Free Cloud Backup & Sync Service
Transfer files between cloud drives, combine cloud storage to gain free unlimited space
Secure & Free


