Which Is the Best Windows Local Backup Software
On this page, information on 2 different Windows local backup software is introduced in detail. After reading, you may have an idea to choose local backup software for your Windows device.
Why need local backup software for Windows?
Although there are various services available to protect your computer from malware and hackers, your Windows computer can still be exposed to many risks, such as natural disasters, human error, and so on. Therefore, you should make a backup for your Windows computer. A local backup is an effective backup solution. Compared cloud backup vs. local backup, choosing great Windows local backup software can let you:
• Restore data quickly: With local backup software, you can restore data not requiring an internet connection, which can improve your working efficiency a lot.
• Know the exact location of files: If you use local backup software, you can know where your data is and can directly control access to it.
Different local backup choices for Windows
To find the best Windows local backup software, here we prepared two different local backup choices - Windows built-in backup tool and free backup software.
Option 1. Built-in backup tool - Backup and Restore
First, we’d like to introduce Backup and Restore a Windows built-in backup tool. Backup and Restore can be the Windows 10/11/8.1/8/7 local backup software to help users backup local files and folders, or create a system image easily. If you lose your data by accident, Backup and Restore can let you restore it with ease. Here are the easy steps to use Backup and Restore as Windows local backup software:
1. Navigate to Control Panel, then choose Backup and Restore (Windows 7).
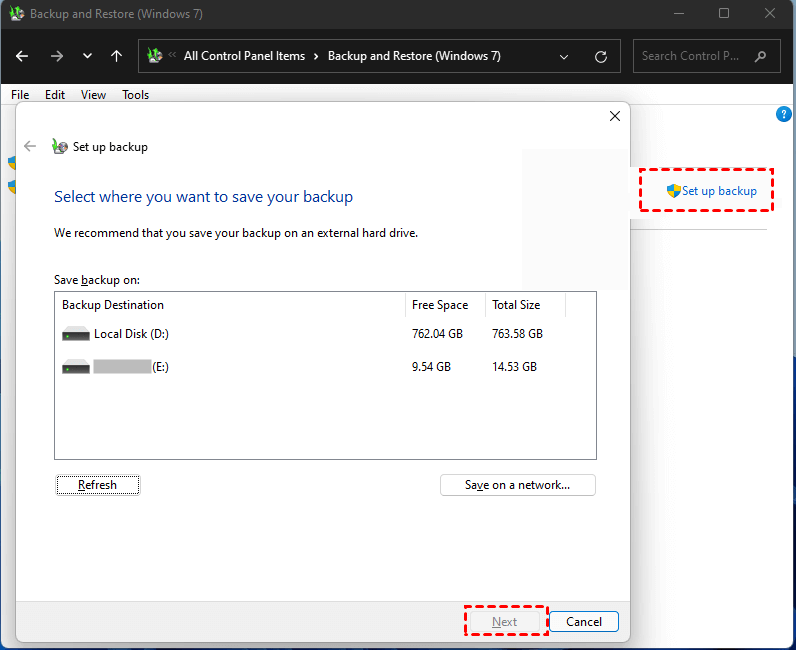
2. Next, click on the Set up backup option on the right. And you can choose a backup destination for your backups.
3. You can select the files that need to be backed up.
4. You can Change schedule and configure other settings for your backups as well. After that, click Save settings and run backup to start your backup.
Option 2. Free backup tool - AOMEI Backupper Standard
In addition to the built-in backup tool, another free backup software can be one of the best local backup software for Windows 10/11/8.1/8/7/XP/Vista - AOMEI Backupper Standard. It can help you backup data on your Windows computer to a local disk, external disk, USB flash drive, etc. Compared with Backup and Restore, AOMEI Backupper Standard provides both local and cloud backup, which means you can backup your file, system, disk, and partition to the cloud or local. And the interface of the AOMEI Backupper Standard client is more clear and much easier to use. With the help of AOMEI Backupper Standard, you can:
• Backup many mainstream file types with different file extensions, such as pictures followed by .png, .jpg, or .gif.
• Backup system, disks, partitions/volumes.
• Restore lost data without effort.
• Create many types of sync tasks: basic sync, mirror sync, two-way sync, real-time sync, etc.
• Enjoy the clone feature for disk, system, partition, volume.
Let’s see how to use it to backup your files to a local destination.
1. Download and install the AOMEI Backupper Standard client on your Windows PC. Then launch it.
2. On the main Backup page, click the File Backup button.
3. Next, choose Add Folder or Add File to choose files or folders that need to be backed up.
4. Then you can select a local path to be the backup destination. After configuration, click Start Backup to backup your files on Windows PC.
Tip: Try cloud backup software for free
In addition to local backup, cloud backup is more popular these years. Because it can provide larger backup space, more flexible subscription plans, and safe cloud storage. For this, we prepare the best free cloud backup software - CBackup for you.
CBackup is a professional cloud backup service, which offers great backup and sync features for free. It is designed for Windows 11/10/8.1/8/7/XP system so you can use it to be your Windows backup software. With the help of CBackup, you can backup files from local to most cloud drives such as Google Drive, Dropbox, OneDrive, and CBackup Cloud. Now, let’s see how to use CBackup to backup your Windows files easily:
1. Download and install the CBackup desktop app on your Windows PC. Sign up for a new CBackup account, then launch the client and log into it.
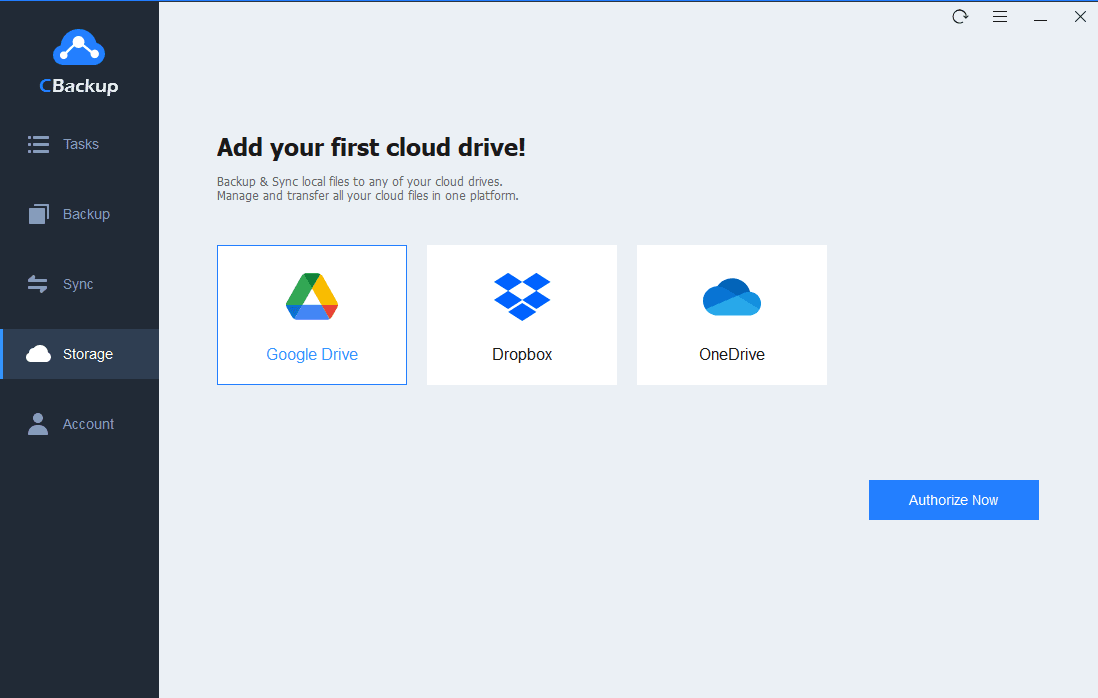
2. Select the Storage section, then add the cloud drive account that you want to use as the backup destination. For example, you can add a Google Drive to CBackup directly.
3. Click on Backup > Backup PC to Public Cloud to create a backup task for your Windows files.
4. You can edit the Task Name. Then select files on your Windows device, and select the Google Drive account you added as the destination.
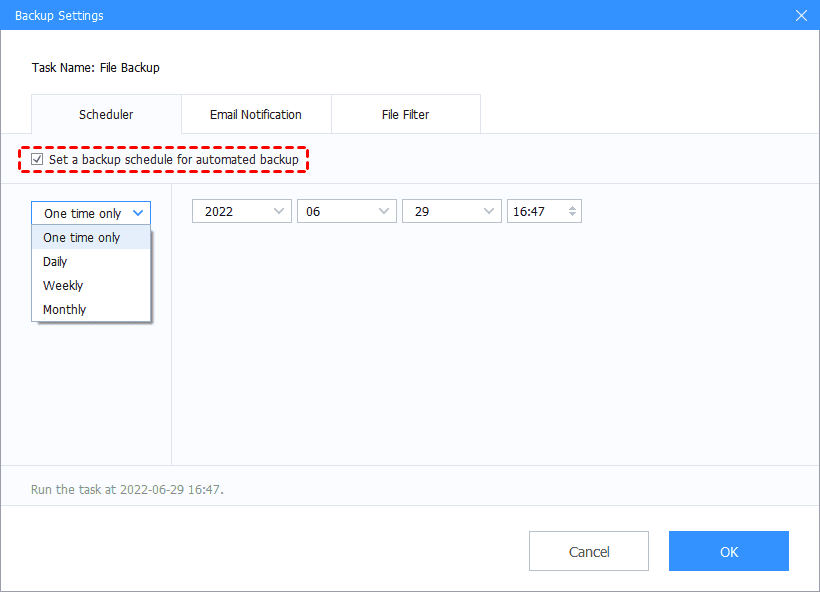
5. (Optional) You can go to the Settings part to make the backup task regular and automatic. There are 4 schedule modes that can be chosen.
6. Finally, click the Start Backup button to backup your Windows files to the cloud for free.
What’s more, you can use some other effective features of CBackup for free:
♦ Cloud to cloud sync: To transfer files between different cloud drive accounts, you can try the cloud to cloud sync feature in CBackup for free. And it allows you to add different accounts of Google Drive, Dropbox, OneDrive, and FTP/SFTP.
♦ Combine cloud storage: With the combined cloud storage feature, you can get more free cloud storage space like 1TB free cloud storage. It allows you to merge unlimited cloud storage accounts to one combined cloud for a larger cloud storage space.
Written in the end
After reading this article, you may find the best local backup software for Windows 10 and other versions of the system. In addition to Windows local backup software, we also introduced the best cloud backup software - CBackup in detail to you. You can try it for free on your Windows PC.


