How to create and start a cloud backup?
Click this article to learn the detailed steps about the operations of creating cloud backup task in CBackup.
In this article, we will learn how to create a cloud backup using CBackup, a reliable cloud backup service. For instance, you can perform a cloud backup from OneDrive to Google Drive with just a few steps.
When creating a cloud backup task, please first add your cloud drives. For the steps to add cloud drives, please click here.
Backup from Public Cloud to Public Cloud
1. Run the desktop app, then sign in to the account you created on the official site. Or, you also can directly log in account on website to create the cloud backup task.
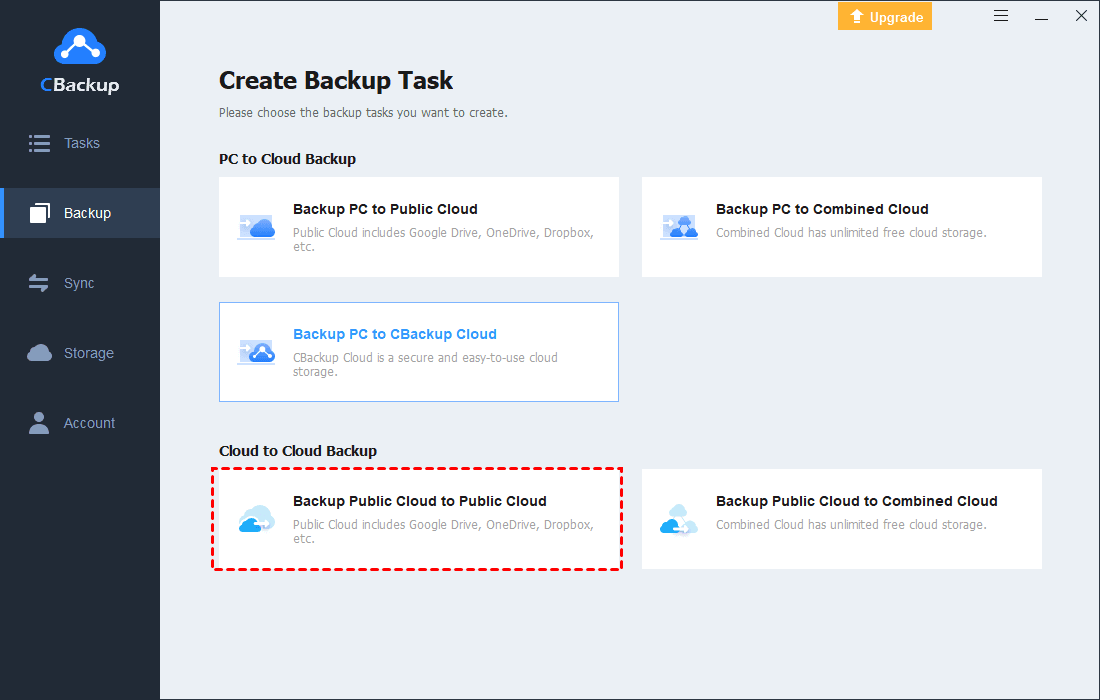
2. Click on the Backup button on the left menu, select "Backup Public Cloud to Public Cloud".
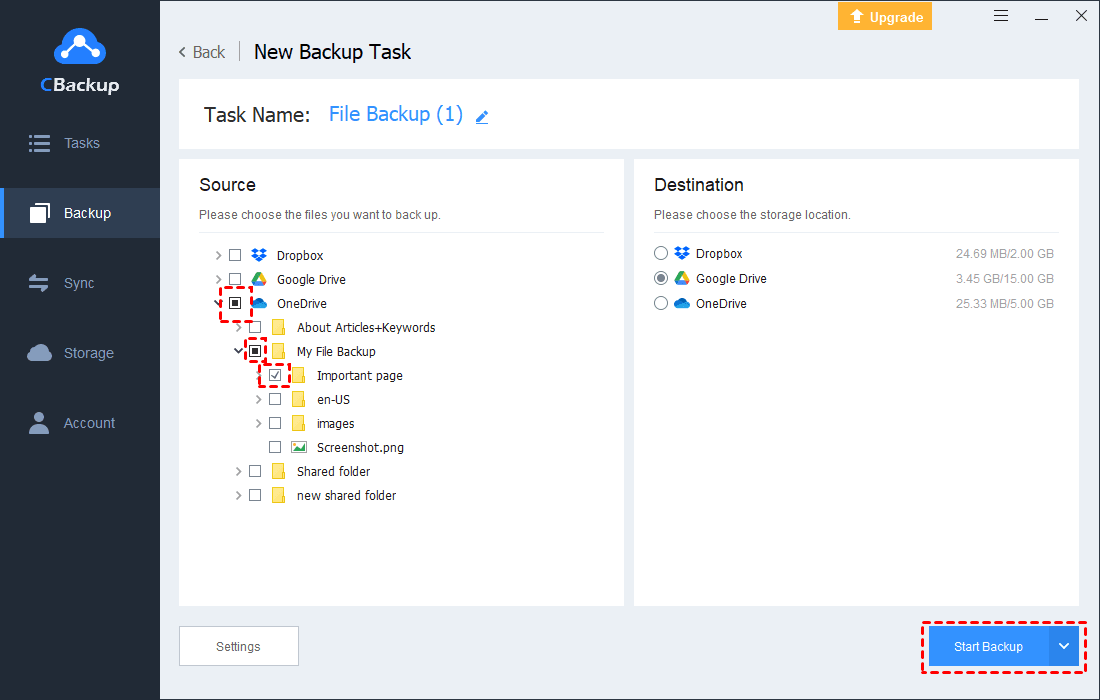
3. In the New Backup Task page, expand and select the cloud and directories you want to back up. And, click and select the target cloud.
4. Optionally, configure backup settings under Settings, such as scheduling, email notifications, Version Cleanup, and filters.
5. Click the "Start Backup" button to begin the backup task immediately. Alternatively, use the down-arrow button and select "Later" or “After 1/2/4/6 hours” to schedule the task for later execution.
Backup from Public Cloud to Combined Cloud
CBackup can help you back up data from a Public Cloud to Combined Cloud. As for combined cloud, please refer to here.
Please follow steps to create task:
1. Run the desktop app, then sign in to the account you created on the official site. Or, you also can directly log in account on website to create the cloud backup task.
2. Click on the Backup button on the left menu, select "Backup Public Cloud to Combined Cloud".
3. In the New Backup Task page, expand and select the cloud and directories you want to back up. And, click and select the combined cloud as destination.
4. Optionally, configure backup settings under Settings, such as scheduling, email notifications, Version Cleanup, and filters.
5. Click the "Start Backup" button to begin the backup task immediately. Alternatively, use the down-arrow button and select "Later" or “After 1/2/4/6 hours” to schedule the task for later execution.
Once you have created backup tasks in CBackup, you can easily re-execute them as needed. Move the mouse over the icon and click the Backup button to start the backup. For more backup management, please refer to here.
The backups can't be accessed directly. You can access and use files after restoring. As for restore steps, please refer to here.
- ★Note:
- For backing up files quickly and making the most of the space of combined clouds, CBackup will split the file into several small slices(32 MB) to back up. The backup files are all block files. These block files will be stored in CBackup's directory under the directory specified by the user, and these block files will be stored in accordance with the user directory structure. In addition, if the generated block file exceeds 32MB, CBackup will split the block file according to the standard of 32MB block. Each block file is 32MB in size, and CBackup will create a folder for these split block files, and save all these segmented block files. if the generated block file does not exceed 32MB, Backup will save the block file according to the corresponding directory structure.
- Please be assured that the splitting will not damage the completeness of the file. After the restore, it will still be an intact file with the original size.
- Please don’t modify, move, and delete backups on the cloud official site. Or else, it might be unable to restore after.
- The first backup run after the backup task is created is a full backup. After the first full backup is run, subsequent backups will only back up the changed files.
Free Cloud Backup & Sync Service
Transfer files between cloud drives, combine cloud storage to gain free unlimited space
Secure & Free


