How to Do A File Restore in CBackup?
This article will introduce the operation of file restore. You can easily restore the backup files to your cloud drive by following the steps below.
Overview
This article will introduce the operation of file restore in CBackup. CBackup allows you to restore files to the original location or new location, so, you can easily perform an OneDrive file restore, Dropbox file restore, or Google Drive file restore to original Cloud Drive or another Cloud Drive with CBackup.
For example, if you have backed up some files from Google Drive to Dropbox, you can restore files to the original location - Google Drive, or another Cloud Drive like Dropbox or OneDrive according to your needs.
You can do a files restore in CBackup by following the steps below:
Restore for Local to Cloud Backup Task
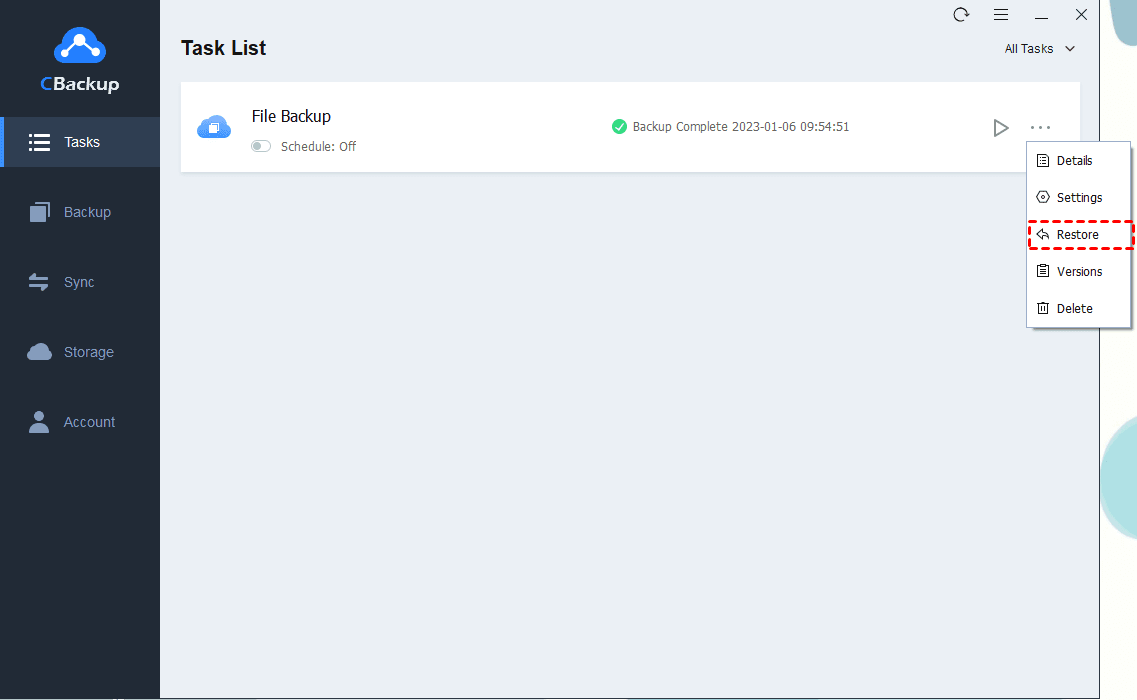
1. Please sign in to your CBackup account first, then click Tasks on the left panel, next, please move the cursor on the backup task then click the three-dot button then select Restore.
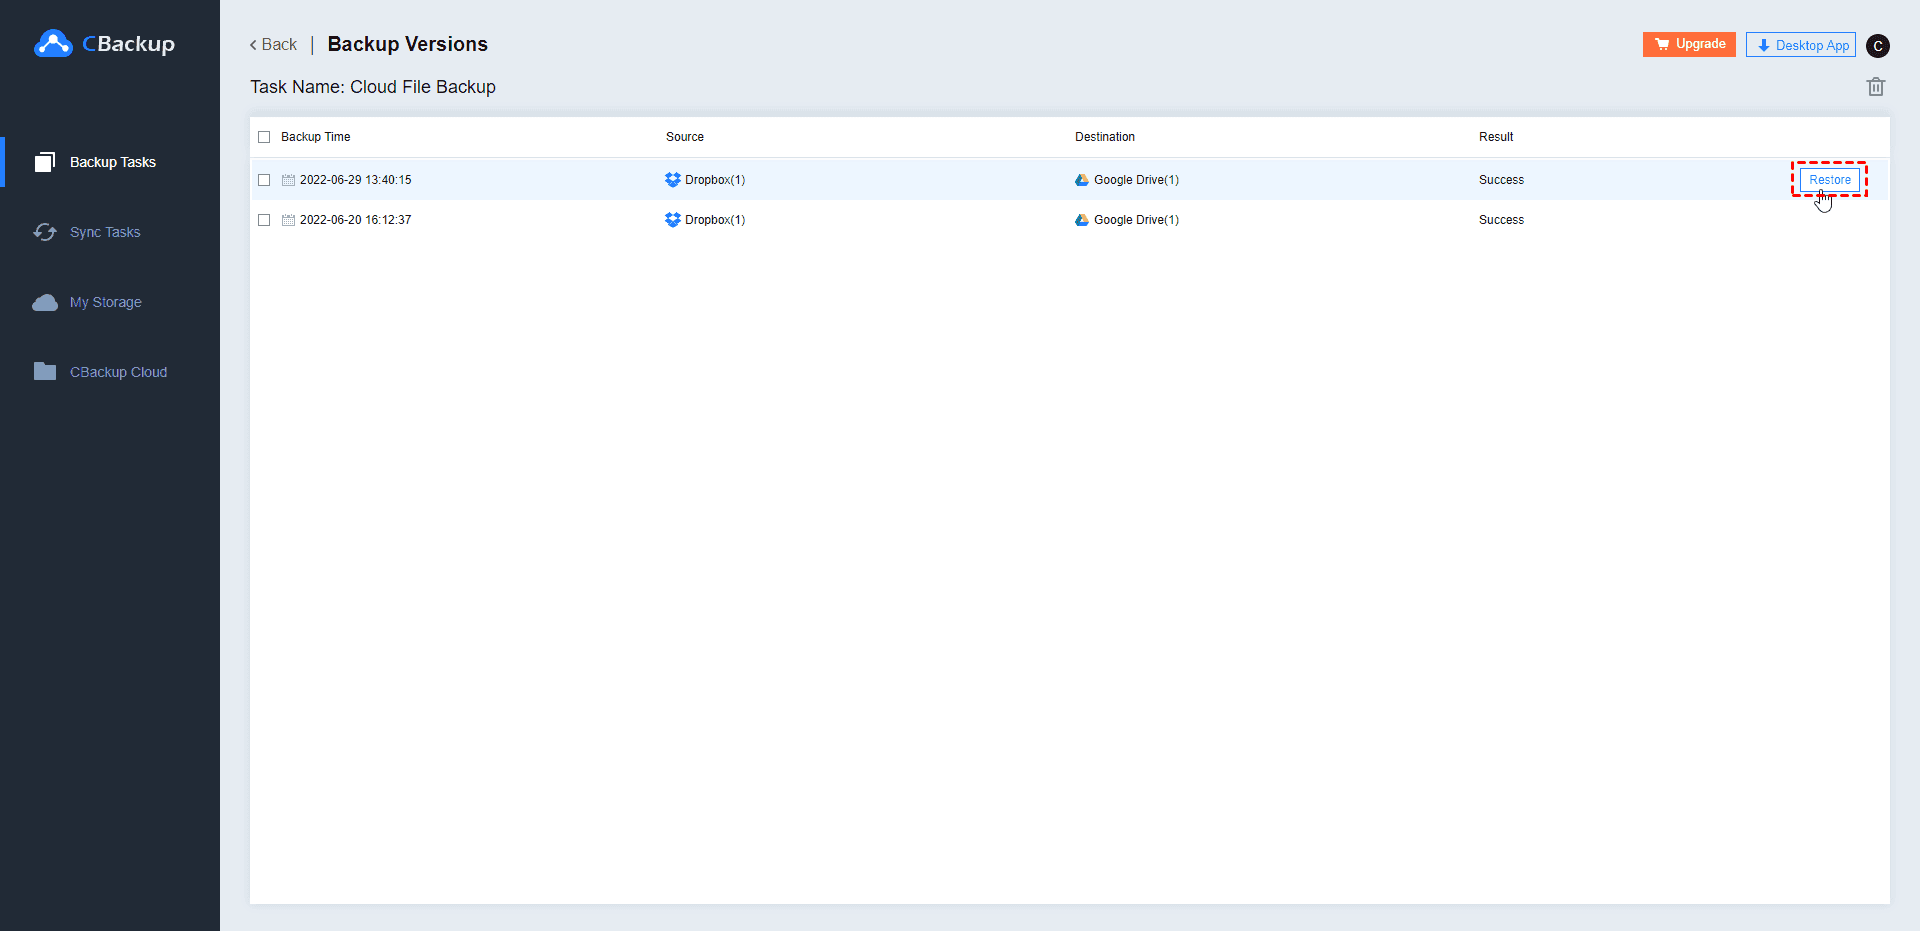
Besides this, you can also select a version of the task to restore, you can move the cursor on the backup task, then click the three-dot button then select Versions, next, move the cursor on one of the backup versions then click the Restore button to restore.
2. On the Ready to restore window, please select a backup version.
Next, expand the root directory then select the files/folders you want to restore under this version.
3. Select Restore Destination, you can choose to restore to original location or other location.
- Restore to original location: The file will be restored to the source file path.
- Restore to other location: You can choose a different path or another cloud drive to save the restored files.
If you choose to restore to other location, please click Select > to choose a target folder, if you choose to restore to original location, you can skip this step to go ahead to next step.
4. Next, please click Settings to set personalized restore parameters, such as Duplicate File Settings and Email Notification. After completing the settings, please click the Start Restore button.
Restore for Cloud to Cloud Backup Task
1. Please sign in to your CBackup account first, then click Tasks on the left panel, next, please move the cursor on the backup task then click the three-dot button, then select Restore.
Besides this, you can also select a version of the task to restore, you can move the cursor on the backup task then click the three-dot button, then select Versions, next, move the cursor on one of the backup versions, then click the Restore button to restore.
2. Then it will prompt a message saying CBakup Desktop App doesn’t support restoring cloud to cloud backup. Please click the Continue button to switch to CBackup Web App.
3. On CBackup Web App, please click Backup Tasks to find your task.
Besides this, you can also directly sign in CBackup Web app to restore, on the Backup tasks page, you can move the cursor on the backup task then click the three-dot button, then select Versions, next, move the cursor on one of the backup versions then click the Restore button to restore.
Or you can also directly move the cursor on the backup task, then click the three-dot button, then select Restore.
4. Click the Select Files button.
5. On the Select Files window, please select a backup version, Next, expand the root directory then select the files/folders you want to restore under this version, click OK.
6. Next, please click the Select Path button to enter the Select Restore Destination window to select the restore path.
In the Select Restore Destination window, you can choose:
-
Restore to original location: The file will be restored to the source file path.
After selecting, click OK.
-
Restore to new location: You can choose a different path or another cloud drive to save the restored files.
After selecting, click OK.
7. Click Start to Restore then you’ll see restore is running.
Restore Settings
Next, let us learn about Restore Settings: Duplicate File Settings, and Email Notification.
Restore Settings - Duplicate File
If you want to perform a restore operation under certain conditions, please set Duplicate File as follows,
①. Click Settings in the Ready to Restore page, and the Restore Settings window will pop up.
②. Select the Duplicate File tab to set handling methods with duplicate files during the restore process, after selecting, please Click OK.
☞ Always keep the latest file: When restoring, the system will compare the modification time of the current file and the backup file, then keep the newer one. If the current file is newer, it will be skipped during restore. If the backed-up file is newer, the current file will be overwritten when restoring.
☞ Replace all: When restoring, only restore files will be kept.
☞ Skip all: When restoring, only local files will be kept.
☞ Keep both files: When restoring, the duplicate file will be renamed with a version time suffix. Example: Sample file (2019-12-12) .txt.
Restore Settings - Email Notification
If you’d like to receive an Email Notification after restoring, please follow the steps below to enable the Email Notification.
①. Click Settings in the Ready to Restore page, and the Restore Settings window will pop up.
②. Select the Email Notification tab, and tick the Enable email notification to turn on the restoration email notification. And you can click here to know more details about enabling email notifications. After setting, please click OK and this modification will be performed at the next restore.
Free Cloud Backup & Sync Service
Transfer files between cloud drives, combine cloud storage to gain free unlimited space
Secure & Free


